


Table of contents
If you’re a developer, you’ve likely heard of Webpack. It’s that powerful tool sitting in your tech stack that bundles your modules, scripts, images and more. But let’s be honest, it can seem a bit daunting, right? This article is here to change that. We’re going to break down Webpack, step by step, and set up a project from scratch. No jargon, no fluff, just practical, hands-on learning. By the end, you’ll have a solid understanding of Webpack and a ready-to-go project setup.
What is Webpack?
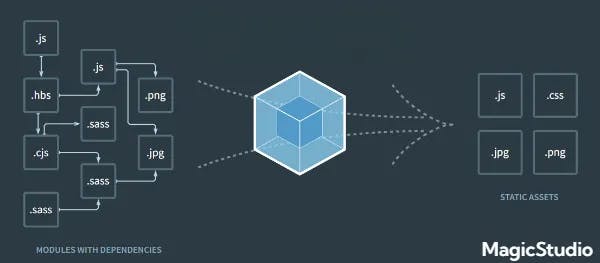
Webpack’s core function is to bundle static modules for modern JavaScript applications. It treats all of your project’s files and assets as modules, generating a dependency graph to determine their relationships. By analysing module dependencies, Webpack can efficiently bundle them into one or more JavaScript files, known as bundles. The browser can then load these bundles, which improves the performance and loading speed of your web application.
Why Use Webpack?
Using Webpack offers several advantages for web developers. First and foremost, it simplifies the management of dependencies. Instead of manually including multiple script tags in your HTML file, Webpack allows you to import and use modules directly in your JavaScript code. This makes it easier to organize and maintain your codebase.
Webpack also optimizes your application by eliminating unused code, reducing the overall bundle size, and improving performance. It can automatically split your code into smaller chunks, which can be loaded on-demand, reducing the initial loading time of your application.
Webpack also supports a wide range of loaders and plugins, which improve its functionality. Loaders allow Webpack to process a variety of files, including CSS, images, and TypeScript, by transforming them into valid JavaScript modules. Plugins, on the other hand, offer additional optimisation and customisation options, allowing you to tailor Webpack to your exact requirements.
Core Concepts of Webpack
To understand and effectively use Webpack, it’s important to grasp its core concepts. These concepts include the entry point, output, loaders, and plugins.
Entry
Webpack’s internal dependency graph begins at the entry point. It determines which modules and libraries your application relies on and incorporates them into the graph. By default, the entry point is set to ./src/index.js, but you can change it in the Webpack configuration file.
Output
The output property instructs Webpack where to emit the bundled files and what names to use for them. By default, the main bundle is emitted as ./dist/main.js, and other generated files, such as images or fonts, are placed in the ./dist directory. You can customize the output path and filenames according to your project's requirements.
Loaders
Loaders are a key feature of Webpack that enable it to process different file types and convert them into valid modules. By using loaders, you can preprocess files before they are added to the dependency graph. For example, you can use the css-loader to handle CSS files and the babel-loader to transpile JavaScript code written in modern ES6 syntax.
To use a loader, you need to define it in your Webpack configuration and specify which file types it should handle. Each loader has its own set of options that you can configure to customize its behavior.
Plugins
Plugins extend the functionality of Webpack by performing tasks that loaders alone can’t accomplish. They offer a wide range of features, such as bundle optimization, code splitting, environment variable injection, and much more.
You can think of plugins as powerful tools that can be integrated into your Webpack configuration to enhance its capabilities. Some popular plugins include HtmlWebpackPlugin, which generates an HTML file with the necessary script tags, and CleanWebpackPlugin, which cleans the output directory before each build.
Setting Up a Project with Webpack
Now that you have a basic understanding of Webpack’s core concepts, let’s get started on creating a project with Webpack. We’ll go over the necessary steps, from installing Webpack to configuring it for a simple JavaScript project.
Step 1: Install Webpack
npm init -y
This command will create a new package.json file in your project directory, which is used to manage project dependencies and scripts.
Next, install Webpack and Webpack CLI as dev dependencies by running the following command:
npm install webpack webpack-cli --save-dev
This will install the latest versions of Webpack and Webpack CLI in your project.
Step 2: Create a Webpack Configuration File
In your project directory, create a new file named webpack.config.js. This file will contain the configuration settings for Webpack. Open the webpack.config.js file in your preferred code editor and add the following code:
const path = require('path');

module.exports = {
  entry: './src/index.js',
  output: {
    path: path.resolve(__dirname, 'dist'),
    filename: 'bundle.js',
  },
};
In this configuration, we specify the entry point as ./src/index.js and the output path as ./dist/bundle.js. This means that Webpack will bundle all the modules starting from index.js and output the resulting bundle as bundle.js in the dist directory.
Step 3: Create a Simple JavaScript Project
Now, let’s create a simple JavaScript project to test our Webpack setup. In your project directory, create a new folder named src. Inside the src folder, create a new file named index.js. Open index.js and add the following code:
console.log('Hello, Webpack!');
This simple JavaScript code will be our entry point for the Webpack bundling process.
Step 4: Build the Project
To build the project using Webpack, open your terminal and navigate to your project directory. Run the following command:
npx webpack
Webpack will read the configuration from webpack.config.js, bundle your JavaScript code, and generate the output file bundle.js in the dist directory.
Step 5: Test the Build
To test the build, create a new HTML file in your project directory named index.html. Open index.html and add the following code:
<!DOCTYPE html>
<html lang="en">
<head>
  <meta charset="UTF-8">
  <meta name="viewport" content="width=device-width, initial-scale=1.0">
  <title>Webpack Demo</title>
</head>
<body>
  <script src="dist/bundle.js"></script>
</body>
</html>
This HTML file includes the bundled JavaScript file bundle.js generated by Webpack.
Next, open index.html in your web browser. If everything is set up correctly, you should see the message "Hello, Webpack!" displayed in the browser's console.
Congratulations! You have successfully set up a project with Webpack and bundled your JavaScript code.
Conclusion
In this guide, we’ve covered the basics of Webpack and walked through the process of setting up a project with Webpack. We’ve explored the core concepts of Webpack, including the entry point, output, loaders, and plugins. By following the steps outlined in this guide, you should now have a solid foundation for using Webpack in your own projects.
Webpack offers numerous features and customization options that can greatly enhance your web development workflow. As you become more comfortable with Webpack, you can explore advanced topics such as code splitting, optimization, and integrating with other tools and frameworks.
References
webpack adoption guide: Overview, examples, and alternatives
Thank you for reading! If you have any feedback or notice any mistakes, please feel free to leave a comment below. I’m always looking to improve my writing and value any suggestions you may have. If you’re interested in working together or have any further questions, please don’t hesitate to reach out to me at fa1319673@gmail.com.