A Deep Dive into Docker Container
Your ultimate guide to Docker and everything about it
Introduction
Containers are one of the most popular and powerful technologies in the world of software development. They allow you to package your applications and their dependencies into isolated and portable units that can run on any platform. But what are containers exactly, and how do they work? And what is Docker, one of the most widely used tools for creating and managing containers?
In this article, we will explore the basics of containerization, the benefits and challenges of using containers, and the features and techniques of Docker. Whether you are new to containers or want to refresh your knowledge, this article will help you understand and appreciate this amazing technology.
What are Containers and Containerization?
Containers
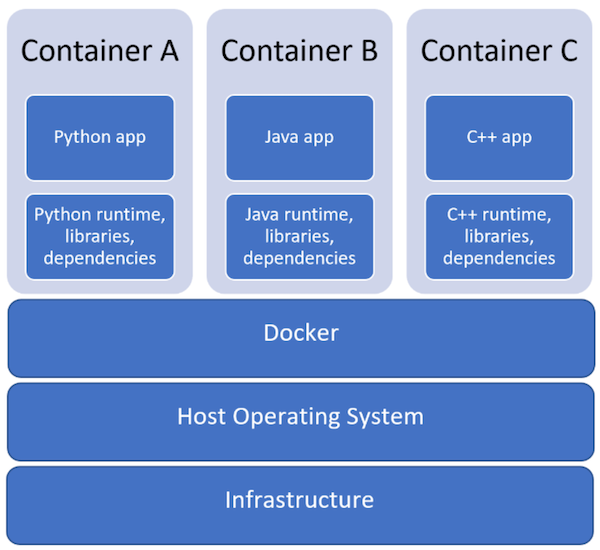
In simple terms, Containers are just Big Boxes of Software that package up code and all its dependencies so the application runs quickly and reliably from one computing environment to another. To do this, containers take advantage of a form of operating system (OS) virtualization in which features of the OS kernel (e.g. Linux namespaces and groups, Windows silos and job objects) can be leveraged to isolate processes and control the amount of CPU, memory and disk that those processes can access.
Containers are small, fast and portable because, unlike a virtual machine, containers do not need to include a guest OS in every instance and can instead simply leverage the features and resources of the host OS.
Containerization
On the other hand, software needs to be designed and packaged differently in order to take advantage of containers — a process commonly referred to as containerization.
So containerization is the process of packing an application with all its dependencies, relevant environment variables, configuration files and libraries. The result is a container image that can then be run on a container platform.
What is Docker ?
Docker is an open-sourced platform that helps developers to easily create, deploy, and manage containers. We already understood what containers are, so think Docker as a manager of your all containers. You can run containers on any machine that has Docker installed, without worrying about compatibility issues or conflicts.
For example, if you are developing a web application, you can use Docker to create a container that has your code, web server, database, and any other dependencies. Then you can run this container on your local machine, or on a cloud server, or on any other machine that has Docker. This way, you don’t have to install and configure everything manually on each machine. You just need to use Docker commands to build, run, and stop your containers.
Why use Docker?
Docker is so popular today that “Docker” and “containers” are used interchangeably. But the first container-related technologies were available for years even decades before Docker was released to the public in 2013.
Docker lets developers access these native containerization capabilities using simple commands, and automate them through a work-saving application programming interface (API). Compared to LXC, Docker offers:
Improved and seamless container portability: While LXC containers often reference machine-specific configurations, Docker containers run without modification across any desktop, data center and cloud environment.
Even lighter weight and more granular updates: With LXC, multiple processes can be combined within a single container. This makes it possible to build an application that can continue running while one of its parts is taken down for an update or repair.
Automated container creation: Docker can automatically build a container based on application source code.
Container versioning: Docker can track versions of a container image, roll back to previous versions, and trace who built a version and how. It can even upload only the deltas between an existing version and a new one.
Container reuse: Existing containers can be used as base images — essentially like templates for building new containers.
Shared container libraries: Developers can access an open-source registry containing thousands of user-contributed containers.
Today Docker containerization also works with Microsoft Windows and Apple MacOS. Developers can run Docker containers on any operating system, and most leading cloud providers, including Amazon Web Services (AWS), Microsoft Azure, and IBM Cloud offer specific services to help developers build, deploy and run applications containerized with Docker.
How to install Docker?

On Windows
Go here and install Docker Desktop.
On MacOS
Go here and install Docker Desktop.
On Linux Distros
Docker provides .deb and .rpm packages for the following Linux distributions and architectures:
Platformx86_64 / amd64
Ubuntu✅
Debian✅
Fedora✅
Docker Architecute
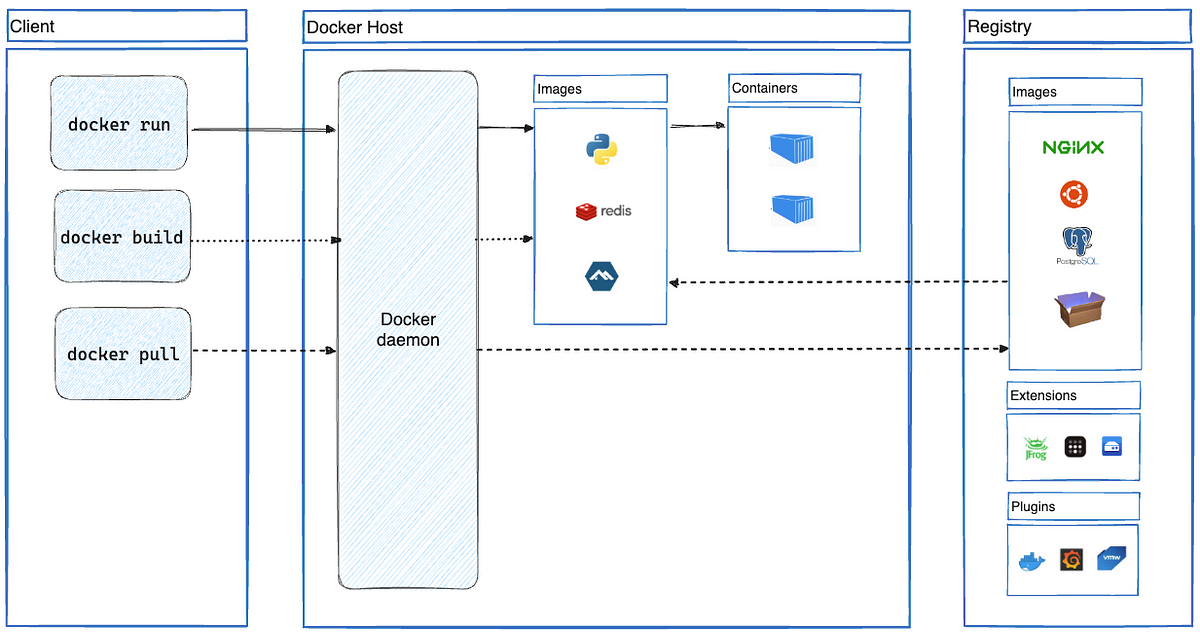
Docker uses a client-server architecture. The Docker client talks to the Docker daemon, which does the heavy lifting of building, running, and distributing your Docker containers. The Docker client and daemon can run on the same system, or you can connect a Docker client to a remote Docker daemon. The Docker client and daemon communicate using a REST API, over UNIX sockets or a network interface. Another Docker client is Docker Compose, that lets you work with applications consisting of a set of containers. We will learn that too further in this article.
What is Docker Daemon?
Docker daemon (dockerd) is a service that runs on your host operating system and manages Docker objects such as images, containers, networks, and volumes1. It listens for Docker API requests from the Docker client and performs the actions requested by the client. It also communicates with other daemons to manage Docker services. Docker daemon depends on some Linux kernel features, so it can only run on Linux systems. However, you can use some tools to run Docker on other operating systems, such as Docker Desktop or Docker Machine, the ones we saw in installation.
What is Docker Client?
The Docker client (docker) is the primary way that many Docker users interact with Docker. When you use commands such as docker run, the client sends these commands to dockerd, which carries them out. The docker command uses the Docker API. The Docker client can communicate with more than one daemon.
Docker Commands and their Usage
Docker commands are the commands that you use to interact with Docker and manage your containers. There are many Docker commands, but here are some of the most common one:
docker build: This command allows you to create a Docker image from a Dockerfile. A Dockerfile is a text file that contains instructions on how to build your image, such as what base image to use, what files to copy, what commands to run, etc. You can use thedocker buildcommand with various options, such as-tto name and tag your image,-fto specify a different Dockerfile name,-qto suppress the output, etc.
For example, docker build -t myapp:latest . will build an image named myapp with the tag latest from the current directory.
docker run: This command allows you to launch a container from an image. A container is a running instance of an image that has its own isolated environment. You can use thedocker runcommand with various options, such as-dto run the container in the background,-pto map ports between the container and the host,-vor--mountto attach volumes to the container,--nameto give a name to the container, etc.
For example, docker run -d -p 80:80 --name web myapp:latest will run a container named web in the background from the image myapp:latest, and map port 80 of the host to port 80 of the container.
docker ps: This command allows you to list your running containers. You can use thedocker pscommand with various options, such as-ato show all containers (including stopped ones),-qto show only the container IDs,-fto filter by a condition,--formatto customize the output format, etc.
For example, docker ps -a -f status=exited --format "{{.ID}} {{.Image}} {{.Status}}" will show all the exited containers with their IDs, images, and statuses.
docker stop: This command allows you to stop one or more running containers. You can use thedocker stopcommand with the container IDs or names as arguments.
For example, docker stop web will stop the container named web. You can also use wildcards or regular expressions to match multiple containers.
docker rm: This command allows you to remove one or more containers. You can use thedocker rmcommand with the container IDs or names as arguments.
For example, docker rm web will remove the container named web. You can also use wildcards or regular expressions to match multiple containers. You can also use the -f option to force remove a running container.
docker images: This command allows you to list your images. You can use thedocker imagescommand with various options, such as-ato show all images (including intermediate ones),-qto show only the image IDs,-fto filter by a condition,--formatto customize the output format, etc.
For example, docker images -a -f dangling=true --format "{{.ID}} {{.Repository}} {{.Tag}}" will show all the dangling images (images that have no tags or references) with their IDs, repositories, and tags.
docker rmi: This command allows you to remove one or more images. You can use thedocker rmicommand with the image IDs or names as arguments.
For example, docker rmi myapp:latest will remove the image named myapp with the tag latest. You can also use wildcards or regular expressions to match multiple images. You can also use the -f option to force remove an image that is used by a container.
These are some of the most common Docker commands that you need to know. There are many more commands that you can explore in the [Docker documentation].
What are Dockerfiles?
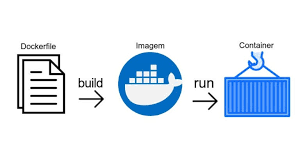
A Dockerfile is a text document that contains all the commands a user could call on the command line to assemble an image.
A Dockerfile has a simple structure: each line starts with a keyword that specifies an instruction, followed by arguments that provide additional information. The instructions are executed in the order they appear in the file, from top to bottom. The first instruction in a Dockerfile must be FROM, which specifies the base image that you want to use as the starting point for your image. The base image can be an official image from Docker Hub, such as ubuntu or python, or an image that you have built yourself. The last instruction in a Dockerfile is usually CMD, which specifies the default command that will run when you launch a container from your image.
Here is an example of a simple Dockerfile that builds an image for a web application:
# Use the official Python image as the base image
FROM python:3.9

# Set the working directory in the container
WORKDIR /app

# Copy the requirements.txt file to the container
COPY requirements.txt .

# Install the required packages using pip
RUN pip install -r requirements.txt

# Copy the rest of the code to the container
COPY . .

# Expose port 5000 to the host
EXPOSE 5000

# Define the default command to run when the container starts
CMD ["python", "app.py"]
To build an image from this Dockerfile, you can use the
docker buildcommand with the name and tag of your image and the path to your Dockerfile. For example,docker build -t myapp:latest .will build an image namedmyappwith the taglatestfrom the current directory. You can then run a container from this image using thedocker runcommand, such asdocker run -p 80:5000 myapp:latest, which will map port 80 of the host to port 5000 of the container and run the web application.
What is Docker Hub?
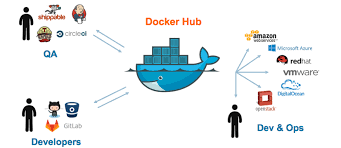
Docker Hub is a collaboration tool and a marketplace for community developers, open-source contributors, and independent software vendors (ISVs) to distribute their code publicly. Docker Hub provides a consistent, secure, and trusted experience, making it easy for developers to access the software they need.
In easiest terms, its Github for Docker Images.
How to push your image to Docker Hub
First, you need to create a Dockerfile for your application. The Dockerfile contains all the instructions needed to build an image of your application.
Once you have created your Dockerfile, you can build your Docker image by running the
docker buildcommand. For example, if your Dockerfile is in the current directory, you can run the following command:
docker build -t your-userme/your-image-name .
This command builds an image with the tag your-username/your-image-name and uses the current directory as the build context.
3. After the build completes successfully, you can push the image to Docker Hub by running the docker push command. For example, if you want to push the your-username/your-image-name image, you can run the following command:
docker push your-username/your-image-name
4. Before you can push your image to Docker Hub, you need to log in to your Docker Hub account using the docker login command. For example:
docker login --username=your-username
This command prompts you for your Docker Hub password.
Once you have logged in, you can push your image to Docker Hub using the docker push command.
That’s it! Your image is now available on Docker Hub for others to use.
Volumes in Docker
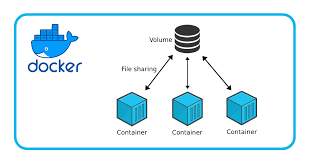
When using multiple containers, you may need a fixed storage place where data will be stored and fetched from for all containers. Volumes is the solution to it. It creates a separate storage in your device which is independent of the state of any container whether it is up or not. Even if your container is down, the volume maintains its state and keeps data and volumes are completely managed by Docker.
You can learn more about them here.
Docker Compose
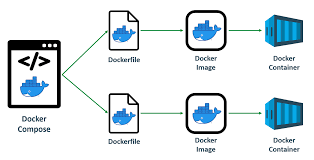
Docker Compose is a tool that helps you define and share multi-container applications. With Compose, you can create a YAML file to define the services and with a single command, you can spin everything up or tear it all down.
The big advantage of using Compose is you can define your application stack in a file, keep it at the root of your project repository (it’s now version-controlled), and easily enable someone else to contribute to your project. Someone would only need to clone your repository and start the app using Compose. In fact, you might see quite a few projects on GitHub/GitLab doing exactly this now.
Here is a step-by-step guide on using Docker Compose:
Put the services for your application in a docker-compose.yml file. A list of services with each service’s configuration options — such as image, ports, environment variables, and volumes — should be included in this file.
Run
docker-compose upto start your application. This will create and start all of the containers defined in your docker-compose.yml file.Use
docker-compose downto stop and remove all of the containers created by your application.Use
docker-compose psto see a list of all of the containers created by your application.Use
docker-compose logsto view the logs of all of the containers created by your application.
Sample Docker compose file for you:
# Define the version of the Compose file format
version: "3.9"

# Define the services (containers) that make up your application
services:
  # The web service
  web:
    # Build the image from the Dockerfile in the current directory
    build: .
    # Expose port 80 to the host
    ports:
      - "80:80"
    # Mount the current directory as a volume in the container
    volumes:
      - .:/code
    # Link the web service to the db service
    depends_on:
      - db
  # The db service
  db:
    # Use the official postgres image as the base image
    image: postgres
    # Set environment variables for the postgres user and database
    environment:
      POSTGRES_USER: admin
      POSTGRES_DB: mydb
This file defines a simple application that consists of two services: web and db. The web service is a web server that runs on port 80 and uses the db service as its database. The db service is a postgres database that has a user named admin and a database named mydb. You can use this file as a template for your own application, or modify it according to your needs.
Networking in Docker
This is one of the most important concepts for you to understand if you want to use Docker in the most efficient way.
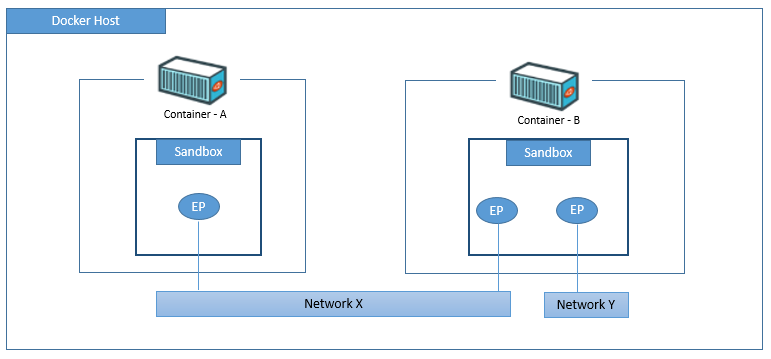
Communication between processes is at the heart of networking, and Docker’s networking is no exception. Networking in Docker is the means through which containers communicate with each other and external workloads. Docker uses a Container Networking Model (CNM) to manage networking for Docker containers. CNM consists of three components: sandbox, endpoint, and network1.
Sandbox: A sandbox is an isolated environment that provides the network stack for a container. It contains the container’s network interface, routing table, DNS settings, and other network resources. A sandbox can be shared by multiple containers that belong to the same network1.
Endpoint: An endpoint is a connection point that links a container to a network. It consists of an IP address, a MAC address, a name, and an ID. An endpoint can belong to only one network, but multiple endpoints can be attached to the same sandbox1.
Network: A network is a group of endpoints that can communicate with each other. A network is created by a network driver, which defines the network’s scope and capabilities. Docker supports several built-in network drivers, such as bridge, host, overlay, macvlan, and none1.
The “bridge” networking mode is Docker’s default networking setting, and it establishes a secure network for communication between containers. Each container in the bridge network is given a different IP address, which it can use to communicate with other containers connected to the same network.
To work with Docker networking, you need to use some Docker commands, such as:
docker network create: This command allows you to create a new network with a specified name and driver.docker network ls: This command allows you to list the existing networks on your Docker host.docker network inspect: This command allows you to view the details of a specific network, such as its configuration, connected containers, endpoints, etc.docker network connect: This command allows you to connect a running container to an existing network.docker network disconnect: This command allows you to disconnect a running container from a network.docker network rm: This command allows you to remove one or more networks.
Here is one example to create a bridge network and run 2 containers on it:
# Create a bridge network named web
docker network create --driver bridge web

# Run a nginx container named web1 on the web network
docker run -d --name web1 --network web nginx

# Run another nginx container named web2 on the web network
docker run -d --name web2 --network web nginx

# Inspect the web network and see the connected containers
docker network inspect web
In addition to bridge mode, Docker also supports host mode, overlay mode, and macvlan mode among other networking configurations.
While overlay mode enables communication between containers running on different hosts, host mode allows a container to share the network stack of the host system. A container can connect directly to a physical network interface on the host machine using Macvlan mode.
Conclusion
You have reached the end of this article on Docker, where I have discussed all the important aspects of Docker and how to use them. These are the things that any person who works with Docker will be using the most, but there are also other aspects that you can always learn according to your needs. For example, you can learn more about Docker security, Docker Swarm, Docker Registry, Docker Hub, and more. You can use this article as a reference whenever you get stuck or want to refresh your knowledge. I hope this article provided value to you and helped you understand and appreciate Docker better. Thank you for reading and happy coding!
Thank you for reading! If you have any feedback or notice any mistakes, please feel free to leave a comment below. I’m always looking to improve my writing and value any suggestions you may have. If you’re interested in working together or have any further questions, please don’t hesitate to reach out to me at fa1319673@gmail.com.
