Hey folks, so today’s article is about an integration I needed for my personal application. Last week I needed to integrate nextauth with my Next.js Application where I was using App router and TypeScript. However, I could not find a single article that could explain the whole process seamlessly and in one place.
So after a lot of searching and hit & trial, I found the way, and now I am going to explain it to you in simple and easy steps. After following this article, you will have an email and password login auth setup in your project with default sign-in and signout page by next-auth(which you can edit as you wish). So let’s get right into it.
Prerequisites
A Next.js Application
Knowledge of JS/TS (as per your project)
Installing NextAuth
First, you have to install the next-auth library into your project. Run the below command:
npm install next-auth
Integrating NextAuth
So Integrating next-auth into your projects requires a few steps only:
- Create an .env file and copy & paste the below variables into it. Replace the NEXTAUTH_SECRET with whatever you want.
NEXTAUTH_SECRET=your_secret
NEXTAUTH_URL=http://localhost:3000
2. Now I am assuming you have a src folder inside which you got your app, now go inside the app folder and create a directory api/auth/[…nextauth] and then create a file inside it called route.ts (or route.js if you’re using JS). Paste the code below into that file.
import NextAuth from "next-auth/next";
import { authOptions } from "@/app/nextauth/NextAuthOptions";

const handler = NextAuth(authOptions);

export { handler as GET, handler as POST };
this will give you an error as we haven’t created authOptions but are importing it, so don’t worry we are going to create it in the next step.
3. Again inside your app folder create another folder called nextauth, this is where we will create our NextAuthOptions.ts and NextAuthSessionProvider.tsx files. The code for both files is below:
//NextAuthOptions.ts

import Credentials from "next-auth/providers/credentials";
import { SessionStrategy } from "next-auth";

export const authOptions = {
  session: {
    strategy: <SessionStrategy>"jwt", // session Stategy type for JWT
    maxAge: 2 * 24 * 60 * 60, // 2 days
  },
  providers: [
    Credentials({
      type: "credentials",
      credentials: {
        email: {
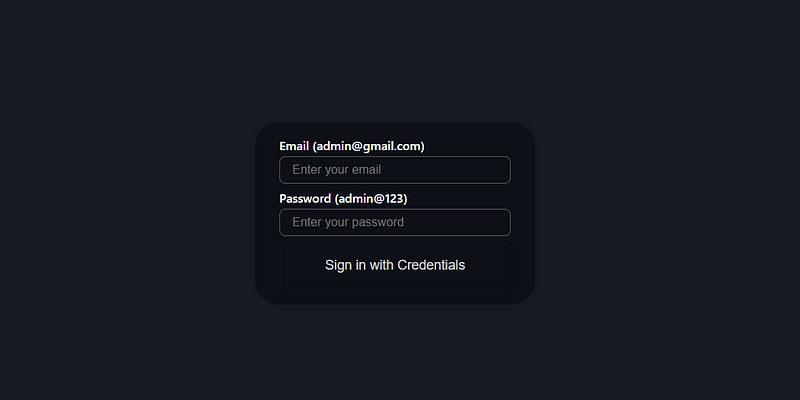
          label: "Email (admin@gmail.com)",
          type: "email",
          placeholder: "Enter your email",
        },
        password: {
          label: "Password (admin@123)",
          type: "password",
          placeholder: "Enter your password",
        },
      },
      async authorize(credentials) {
        const { email, password } = credentials as any;

        if (email === "admin@gmail.com" && password === "admin@123") {
          return {
            id: "1", // Changed Id to id (lowercase)
            email: email,
            userName: "Faizan",
          };
        } else {
          return null;
        }
      },
    }),
  ],
};
this authOptions will create a Credentials Provider for next-auth and we have used a static email and password to sign-in for now(which you can change as you want).
We are also using JWT for security and its age is set to 2 days here.
//NextAuthSessionProvider.tsx

"use client";

import { SessionProvider } from "next-auth/react";

const NextAuthSessionProvider = ({
  children,
}: {
  children: React.ReactNode;
}) => {
  return <SessionProvider>{children}</SessionProvider>;
};

export default NextAuthSessionProvider;
this is the session provider around which you have to wrap your app. With this, all files you need to set up nextauth are created.
4. Now you need to wrap your app file inside the provider. If you are using Approuter, you will have layout.tsx (or layout.js) and if you are using a pages router, you have to create _app.js. Here I will show code for layout.tsx.
import type { Metadata } from "next";
import { Inter } from "next/font/google";
import "./globals.css";
import NextAuthSessionProvider from "./nextauth/NextAuthSessionProvider";

const inter = Inter({ subsets: ["latin"] });

export const metadata: Metadata = {
  title: "Next.js App",
  description: "Integrating Next Auth",
};

export default function RootLayout({
  children,
}: Readonly<{
  children: React.ReactNode;
}>) {
  return (
    <html lang="en">
      <body className={inter.className}>
          <NextAuthSessionProvider>
            {children}
          </NextAuthSessionProvider>
      </body>
    </html>
  );
}
And with this, the only thing left is choosing what routes of your app to protect and which ones to spare which we will see in the next step.
5. Creating Middleware file, now go outside your app folder into your src folder and create a file named middleware.ts and paste the code below into it:
export { default } from "next-auth/middleware";
//to cover all routes under authentication
this will by default put all your routes in the app under auth, but if you want to exclude some pages, you can exclude them here too like below:
import { withAuth } from "next-auth/middleware";
import { NextResponse } from "next/server";

// Define the routes to exclude from authentication
const excludedPaths = ["/login", "/register", "/public", "/api/public-endpoint"];

export default withAuth(
  function middleware(req) {
    const path = req.nextUrl.pathname;

    // If the path is in the excluded list, allow access without authentication
    if (excludedPaths.some((excludedPath) => path.startsWith(excludedPath))) {
      return NextResponse.next();
    }

    // For all other paths, the user must be authenticated
    return NextResponse.rewrite(new URL('/api/auth/signin', req.url));
  },
  {
    callbacks: {
      authorized: ({ token }) => !!token, // Check if the user is authenticated
    },
  }
);

// Specify the matcher to apply the middleware to all routes
export const config = {
  matcher: ['/((?!_next/static|_next/image|favicon.ico).*)'], // Exclude Next.js static files
};
now if you have followed all the above steps correctly, when you try to access your app on https://localhost:3000, you should see the screen like below:

and now for signout, you just have to import signOut from next-auth which will land you on this page again.
import { signOut } from “next-auth/react”;
and put on your Logout button or icon.
Thank you for reading! If you have any feedback or notice any mistakes, please feel free to leave a comment below. I’m always looking to improve my writing and value any suggestions you may have. If you’re interested in working together or have any further questions, please don’t hesitate to reach out to me at fa1319673@gmail.com.
